Thursday, March 24, 2011
Decorated T-Shirt
We live in a little valley called the San Luis Valley. (Go ahead...google it.) A whole lot of farm land and a whole lot of mountain views. While it's beautiful...there is a drawback. There aren't many places to shop for kids clothes. There is a Super Walmart, and a JC Penneys (well, it's actually like 1/4 of the size of a regular JC Penneys and it's in historic downtown Alamosa. My dad manages it. GO DADDY!!!) and there are thrift stores. I guess I'm a little bit vain, because I HATE buying clothes at Walmart because I know every other kid in the valley has the same shirt or pants or whatever. And the closest big city is about 3 hours away. (Which STINKS!!!) and we hardly ever get to go to the big city. So, what can a girl do other than order online? Well, she can make her own clothes!
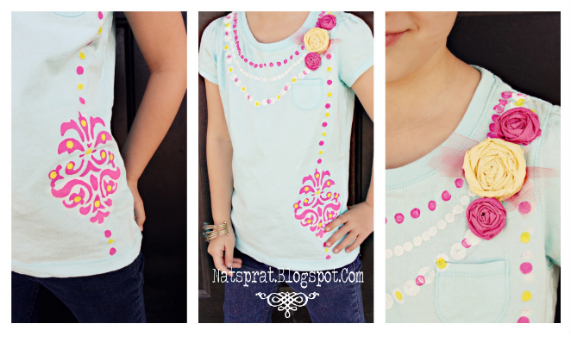
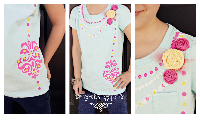
For this project, I bought a $4 plain T from Walmart. I bought some Folk Art Textile Medium (It makes the acrylic paint permanently bond to fabric) and some Folk Art acrylic paint. (The colors I used on this T are 509 Sunny Yellow, 2546 Bright Pink, and 901 Wicker White.) You mix the paint 2 parts medium to 1 part acrylic paint. They have these 48 piece packs of 3" decorative stencils at Walmart for about $3. I got the damask pack. Then I just stenciled on the designs I liked!
For the necklace part, I used a Crayola marker lid and a pencil eraser and just dipped it in the paints and pressed it onto the shirt in a necklace shape.
Annnnd, of course, what would a Natalie project be without a rosette? Why, it wouldn't be a Natalie project at all. So, I made some rosettes but instead of hot glue I used permanent fabric glue to glue it together and stitched some mesh on the back. Then I glued that to the T.
I LOVE that it's unique, cute, and NOBODY else has it around here! And my daughter ADORES it, which is what really matters. ;)
Posted by Natalie at 12:37 PM
Subscribe to:
Post Comments (Atom)






























4 people leaving some love!:
I love this! I have been wanting to do a shirt like that for me. So I will and will share it with you. Blessings, Lori
Very cute. I like that you used stencils instead of freezer paper. I want so very badly to be able to do freezer paper stencils, but without a fancy cutter, it is too time consuming to cut them out.
Hi stopping by from Friday blog hop
I love a good snow cone yummy
http://www.etsy.com/shop/ThisanThatBoutique
http://thisnthatboutiqueblog.blogspot.com/
http://www.facebook.com/Thisnthatboutiquefans
Love it! I love the rossets and the stenciled bead necklaces.
I am having a giveaway on my blog.
$40 + free shipping from o&el to any drawstring backpack and amazing spring accessories for your little girl. All you have to do is leave a comment.
http://houseonashwelllane.blogspot.com/2011/03/40-store-credit-free-shipping-from-o-to.html
Post a Comment