


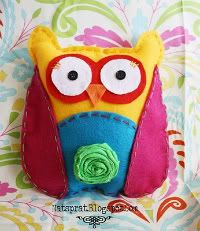
Who wants a NO SEW tutorial for this ADORABLE owl plushy that ONLY takes about 45 minutes to make? This would be PERFECT for Activity Day projects or Young Women activities!
*NOTE* You can hand stitch everything if you don't want to use the glue gun! ;)
SUPPLIES:
6 sheets of felt
*2 sheets for body
*1 white for eyes
*1 for wings (any color you want)
*1 for belly (any color you want)
*one for the nose (I used orange)
Glue gun/gluesticks
Needle and Embroidery thread (any colors you want)
stuffing (not the kind you use in a Turkey...)
The Template (save it as an image, open in Word Processor/Works/Photoshop) and print
Scissors
2 buttons (or you can cut out 2 small circles of felt for the pupils)
OWL TEMPLATE (2 pages)
Each page is the size of an 8.5 x 11 piece of cardstock
Each page is the size of an 8.5 x 11 piece of cardstock

 Okay, now you're going to cut out the pieces. These will be your pattern for you to trace onto the felt. I didn't include the beak...but it's just a little triangle. (see below)
 Now, decide what color you want the different parts of the owl. Trace the part of the owl you want on the color of felt you want it to be. For the body, you will need 2, one for the front, and one for the back.
 Once you have all your pieces cut out, you'll lay it out like THIS (These are Whitney's owl pieces)
 Now, if you want to you can just stitch the pieces individually. See the picture of the final product up at the top? I hand stitched the wings, belly, top of the head and some eyelashes on the eyes. You can do it however you want though! There are so many fun things you can do to make it your own!
After your pieces are stitched to your liking, you'll start to glue them onto the owl. Start gluing with the eyes. First, attach the buttons to the white circles. Then glue the white circles onto the "behind eyes" part. Then, the belly, and then the wings on top of that. Oh! And you can decorate the belly any way you want, too! I put a fabric rosette on mine. (Want the tutorial for the rolled fabric rosettes? Click HERE!)

Now that the front of your owl is done, you'll flip the owl over and attach the back. (Notice how the owls have switched colors? I got impatient and decided to make one for Kate's room since Whitney was taking so long! LOL)
 Now, you'll glue the VERY OUTSIDE edge of the owl like so. Make sure to leave an open space about 3" at the bottom to insert the stuffing.
 Now, flip it over, take your stuffing and stuff that bird! You can stuff it as much as you like. Make sure to poke stuffing up into the ears.
 When you're done stuffing, carefully glue the bottom edge closed.
Now for the hardest part. Just kidding. You're done! :)

Now, doesn't that go just perfectly with the fabric for Kate's room! ;)
Want to see the owl with Kate's new room makeover? Click HERE! SOOOO CUTE!


Fingerprints on the Fridge
DIY by Design
Want to see the owl with Kate's new room makeover? Click HERE! SOOOO CUTE!


Fingerprints on the Fridge
DIY by Design


27 people leaving some love!:
Your are seriously talented! I can't believe the cute stuff you make!
Super cute!! ♥
Oh too cute!! Thanks soooo much for the pattern! I have been looking for one!
That is just too cute... Thanks for the fun idea!
This is too cute, I'm all about glue guns but you really have to have patience for it to harden with felt! Is it just me or are owls everywhere right now? I am totally obsessed. Giraffes too, but they aren't as cute with little pillows like your little owl is. Check out my blog sometime too, you might see a little owl creep up soon! www.craftsbyholly.blogspot.com
Aahhh! Look how cute! I'd love for you to submit this to the M&T Spotlight - http://www.makeandtakes.com/spotlight
You got it, Laurel! :)
Thank you SO much from all of us who want badly to create, but never learned how to sew. I love it! :)
Hi Natalie.
Love this project! (btw, I am from Pagosa Springs) :0) Hopped over from Tip Junkie's Tip Me Tuesday. I'm your newest fan and would love to follow or subscribe. Can you tell me how? Have a terrific day.
Charlene
www.theinspiredretreat.blogspot.com
As much as I love to sew, I love me a no sew project! This is so cute, thanks for providing a template!
That is so cute. I'm your newest follower. Be sure to stop by my blog Monday and add your project to the More The Merrier Monday Link Party.
http://diyhshp.blogspot.com
This is sooo adorable and the fact that you didn't sew it makes it twice as awesome! Love it! Hope you will share with my Pink Hippo Party @ http://pinkapotamus.blogspot.com/2011/02/pink-hippo-party-17.html
Im a new follower! This is just so adorable!!
OMGosh! That is so cute1 i am so going to do that with my class. We have an owl that lives in the school and so these would be such a hit. Many thanks, Fiona
What an adorable owl! I love it! I featured it on Hoo's got talent! Thanks for linking it up to the party!
So cute!! thanks for sharing
too cute! I can't sew so this is perfect :)
love your blog it's super cute!
What a cute little project! Love the colors you used! Would love for you to join my linky party.
http://www.inspiringcreationsblog.com/2011/03/friday-favorites-linky-party_24.html
I love this! My daughter's room has owls also and I have been wanting to make her something (but I'm not so good at the sewing thing) so this is perfect!
This is adorable!
So cute! I just got my kids one of those cool temp glue guns so they can do some projects on their own ~ this will be perfect!
Laura @ Come Together Kids
cute cute cute! Thanks for auditioning for American Crafter- good luck:)
Thanks for this!! My little sister loves owls and we made some today...we didnt have felt so just used regular fabric and made this "mini" owls...Too cute! I put a link back to your blog on mine with a picture of ours. Thank you again!
Awesome job! Thanks for sharing. I pinned it.
I found this on Pinterest and I love it! It will be perfect for my daughter's Night Owl Birthday Party. I am a little new to crafting. How much stuffing would you estimate you need for one? (Or for 15 kids coming?) Thanks!
-Moriah in Illinois
Hi Moriah!I would probably say about 1 1/2 to 2 cups of stuffing per owl?
Thanks!
Moriah
Post a Comment