


Oh, Heaven help us!!! At dinner today, little miss Kate discovered she can put things up her nose. (Yes, that is green pepper and not a monster bugger.) I've heard so many horror stories of kids putting stuff up their noses. For my husband's sister it was a bean that started to rot and they couldn't figure out why she stunk so bad. For me it was a rock I had to have removed by a doctor. I walked around saying "Rock'a nose! Rock'a nose!" for a while until my parents figured out what on earth I was talking about. I can't wait to see what else this kid comes up with. Wait...that's a lie. I can TOTALLY wait! Now, does anyone have any fun horror stories to share? ;)
Sunday, February 27, 2011
Nobody 'Nose' The Trouble I've Seen...
Friday, February 25, 2011
Cupcake Pin Cushion GIVEAWAY!!!
 Would you like this delicious little morsel of awesomeness? Sweet! But don't really eat it....it's actually a pin cushion I designed! (No, really!) I've decided to have a givaway. And YOU, my friends can win it. Here's how to win:
1. Become a follower= 1 entry
2. Tweet about the giveaway= 1 entry
3. Blog about the giveaway= 5 entries (and everyone who tells me about finding out about this giveaway on your blog = another entry!)
4. post the giveaway on facebook= 1 entry
Make sure you leave a comment for each thing you do to enter, a'ight?
Woo-hooo! And if you don't win...don't cry too hard. If this gets a good response I'll do a tutorial! ;)
This giveaway ends MARCH 1st.

Sunday, February 20, 2011
Dream Rooms Do Come True.
*For new readers, this post is the follow up to Interior Decorating 101! *
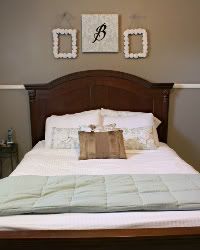
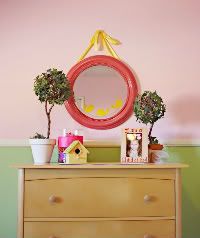
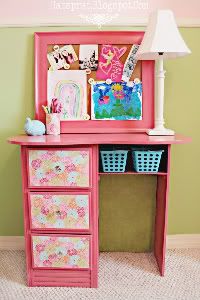
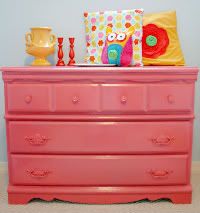
Drumroll please....it's time for Kate's room's big reveal! *applause*. I am so excited about it, I think it turned out FABULOUS! I still have a few more things to do, but all in all it's done! Let's start with Kate's dresser.
 I found this at the Nazarene Thrift store for $35. It was gray and ugly, but I loved the shape and the details of the handles. I wanted to take them off and spray paint them mustard yellow...but those suckers were S.T.U.C.K. I think it turned out cute anyway. I love Krylon Spray Paint...and I seriously love these handles!!!! What a find! I think there was divine intervention here.
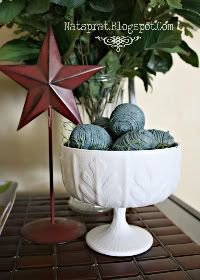
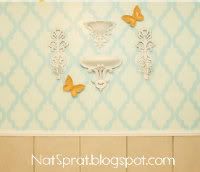
Now, to decorate the top of the dresser. Remember my $3 clearance grecian urn I told you I found? Here is the BEFORE picture of it.
 and after....
 and the candlesticks were 50 cents at Rainbows end. They were plain wood, so I spray painted them red. So cute! Now, I have to say that my FAVORITE decor on the dresser is THIS.
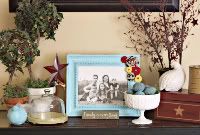
 My dear, sweet, amazing, FABULOUS friend Mandy took these pictures in the hospital after Kate was born. She is so incredible at capturing the sweetest moments. THANK YOU MANDYYYY! I had forgotten how tiny my little 5 pounder was. The frame was $1 at Rainbows end. Such cute scroll details!
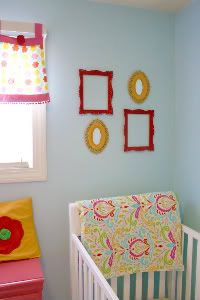
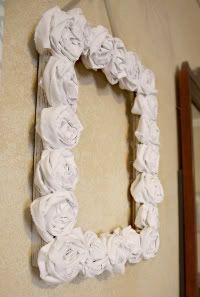
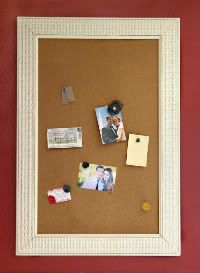
Now, how are THESE for some ugly frames!?! I was SO happy when I found them! I think Rainbows end thought they were hideous, too, because they were super cheap. Like...a few bucks for the set cheap. But, look at the detail! It was exactly what I was looking for, minus the creepy painted victorian children in the picture...which I had already taken out before I took this picture because they scared me.

Anyway....this is where they hang now. Red, and SUPER CUTE. The yellow oval mirrors were at Rainbows End, too...they were $2 for the set. I spray painted them the same color as the urn.
 See that beautiful quilt? Recognize the fabric? Yes, that's the fabric I was drooling over! My incredibly talented Sister-In-Law Kathy sewed it for me. (btw, check out her fun blog at Gotta Try That!)
Watching her sew the quilt gave me some courage, and so I went over to my parent's house and asked to use my mom's sewing machine. I made some throw pillow covers. All by myself!
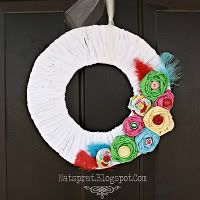
 The one with the red felt flower is my favorite. I'm so proud of it!
 So, THEN I decided I wanted to sew up some curtains for her room with the extra fabric. Mom let me take the sewing machine back to our house and I stayed up til 2 a.m. making this valance.
 I thought it would be really cute with some rosettes, so I added some to the top. The curtains turned out amazing. I seriously started to cry because I was so happy!
 And there you have it! I think it's so awesome to look back now at my "Dream Room" folder, see the pictures of things I liked and really wanted for Kate's room, colors I liked, fabrics I adored....and see how so many of my ideas came true! And I KNOW you can do it, too! If you want any tutorials for anything you see, let me know, mmmmkay?
Thursday, February 17, 2011
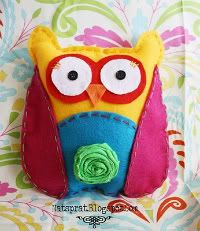
No Sew Felt Owl Plush

Who wants a NO SEW tutorial for this ADORABLE owl plushy that ONLY takes about 45 minutes to make? This would be PERFECT for Activity Day projects or Young Women activities!
*NOTE* You can hand stitch everything if you don't want to use the glue gun! ;)
SUPPLIES:
6 sheets of felt
*2 sheets for body
*1 white for eyes
*1 for wings (any color you want)
*1 for belly (any color you want)
*one for the nose (I used orange)
Glue gun/gluesticks
Needle and Embroidery thread (any colors you want)
stuffing (not the kind you use in a Turkey...)
The Template (save it as an image, open in Word Processor/Works/Photoshop) and print
Scissors
2 buttons (or you can cut out 2 small circles of felt for the pupils)
OWL TEMPLATE (2 pages)
Each page is the size of an 8.5 x 11 piece of cardstock
Each page is the size of an 8.5 x 11 piece of cardstock

 Okay, now you're going to cut out the pieces. These will be your pattern for you to trace onto the felt. I didn't include the beak...but it's just a little triangle. (see below)
 Now, decide what color you want the different parts of the owl. Trace the part of the owl you want on the color of felt you want it to be. For the body, you will need 2, one for the front, and one for the back.
 Once you have all your pieces cut out, you'll lay it out like THIS (These are Whitney's owl pieces)
 Now, if you want to you can just stitch the pieces individually. See the picture of the final product up at the top? I hand stitched the wings, belly, top of the head and some eyelashes on the eyes. You can do it however you want though! There are so many fun things you can do to make it your own!
After your pieces are stitched to your liking, you'll start to glue them onto the owl. Start gluing with the eyes. First, attach the buttons to the white circles. Then glue the white circles onto the "behind eyes" part. Then, the belly, and then the wings on top of that. Oh! And you can decorate the belly any way you want, too! I put a fabric rosette on mine. (Want the tutorial for the rolled fabric rosettes? Click HERE!)

Now that the front of your owl is done, you'll flip the owl over and attach the back. (Notice how the owls have switched colors? I got impatient and decided to make one for Kate's room since Whitney was taking so long! LOL)
 Now, you'll glue the VERY OUTSIDE edge of the owl like so. Make sure to leave an open space about 3" at the bottom to insert the stuffing.
 Now, flip it over, take your stuffing and stuff that bird! You can stuff it as much as you like. Make sure to poke stuffing up into the ears.
 When you're done stuffing, carefully glue the bottom edge closed.
Now for the hardest part. Just kidding. You're done! :)

Now, doesn't that go just perfectly with the fabric for Kate's room! ;)
Want to see the owl with Kate's new room makeover? Click HERE! SOOOO CUTE!


Fingerprints on the Fridge
DIY by Design
Want to see the owl with Kate's new room makeover? Click HERE! SOOOO CUTE!


Fingerprints on the Fridge
DIY by Design
Wednesday, February 16, 2011
Interior Decorating 101
I thought I'd do a post on interior decorating. A lot of people ask, "Where do I even start!?!" So, here are some helpful tips for when you want to change up a room.
1. Scour the internet. Check out Pottery Barn Kids Do something as simple as google "cute bedroom". No seriously...do it. There are some REALLY cute ideas! Like these..


2. Find out what it is about the picture you like. Is it the wall/paint color? Is it the bedding? Is it the colors of the room all put together? Is it the cute mirror? Save the picture and put it in a folder named, "My dream room" so you can refer back to it.
Then, you can start to put your room together. I'm working on Kate's room right now, I'll give you a sneak peak at some of the things I'm planning for it!

I've already bought the fabric. The second I saw the Kate Spade Kumari Garden fabrics I knew that was what I wanted. I designed the entire room around the fabric! I'll be making a "duvet" cover for her toddler quilt, throw pillows and window coverings.

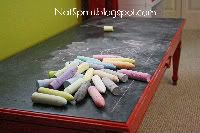
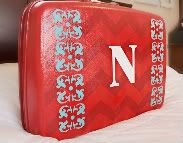
I've got mustard yellow, pink and red spray paint to paint things as accents. Like this:

We got this on sale at Target in Golden, and the bins don't match. So, I'm spray painting them.
 And I found a cute shabby dresser at the Nazarene Thrift store to spray paint pink, found some old vintage fames at Rainbows End (another local thrift store) and even found a Grecian urn at Alco on clearance for $3! Having pictures helped so much, because I knew exactly what I wanted. And when I saw it, I got it. I haven't gotten the vinyl chandelier yet...it's on etsy for $20 and I'm still debating on whether to just buy it or attempt to stencil it on my own. I'm thinking as soon as I get $20 I'll just end up buying it because I stink with exacto knives and intricate details.
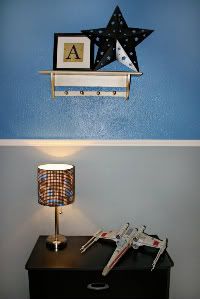
3. Re-purpose! Try to find things you already have that you can fix up/spray paint to make it work. Like the black lamp for Whitney's room that I spray painted pink? I forget it's even the same lamp, it looks so different! Picture frames can be turned into cork boards...things like that.
Well, that's probably enough for one day...hopefully it's enough to get you started! Have fun!!! That, of course, is the most important part. :)
Well, that's probably enough for one day...hopefully it's enough to get you started! Have fun!!! That, of course, is the most important part. :)
Tuesday, February 15, 2011
Pillowcase Tutorial
Has anyone else been drooling over the Pottery Barn Star Wars bedding? I have. And it's EXPENSIVE!!!! So, I was thinking to myself, "I bet I could make my own." I mean, it's no Pottery Barn or anything, but it'll do. And it's SUPER EASY!!! So, here we go!
First, you'll need a pillowcase. I got a solid blue one at Walmart for about $2.50. Then, you'll need some felt. It's easy to find and inexpensive. Pick the color you want and hurry home! You'll want to wash/dry and flat iron it if it's wrinkled. ;) ( I swear, that's the hardest part because I can't wait to get started on my project!)
First Step: You find an image online that you want. Save it, and open it with your picture editing software, or even something like Microsoft Word Processor. You flip the image so it's a mirror image, and then you make it as big as you want. Mine was just "Star Wars" text.
Step 2: take a sheet of felt (mine was 49 cents at Walmart) and carefully tape it to the top of your screen. With a pen or marker, LIGHTLY trace the image onto the felt. 
Step 3: Cut out the image with your scissors.
Step 4 (OPTIONAL): I wanted a more finished look to my design, so I just stitched the edges. You don't have to if you don't want to. Step 5: Since it's felt and it will likely fray and get nasty, put some Fray Check along the edges. It will make the edges stiff and keep the shape better. Don't know what Fray Check is? You can find it at any sewing store or Walmart. It's very inexpensive and it awesome stuff.It looks like this:
 Step 6: No sewing involved, so don't be scared! All you'll do is glue the pieces on with your hot glue gun! See? Easy peasy. Once you've got them in place, you can kind of lift up the corners and edges and make sure they're glued down tight.
And now you're all done!

I have so many plans for making more pillows...the possibilities are endless!!! This is my next project...I can't wait! :)


Subscribe to:
Comments (Atom)


