


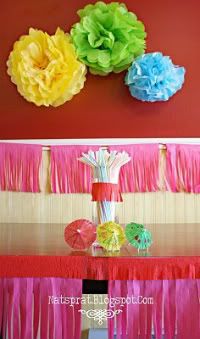
Here is the first edition of the birthday party decoration series! Okay...there will only be 2. But the first one is really easy. They are all made out of tissue paper. I think I only ended up spending about $25total for the entire party. That's feeding 16 people, too. Maybe $7 for the decorations total?
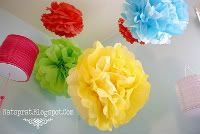
These are HUGE TISSUE PAPER FLOWERS that are super easy to make. You can make them all one color, or change it up with several colors. We did red, orange, yellow and hot pink as our color theme. Like...a cute fiesta! Thanks to Martha Stewart for the great idea and easy instructions!
*I should note that for the center of my flower, I just made a smaller version of the flower using only one color of tissue paper and glued it to the middle. And I didn't puff the whole thing into a circle, it was flat on the back so I could hang it on the wall. *
Also, a cheap meal idea when you're feeding lots of people, a nacho buffet! (Joke time...what do you call a buffet that isn't yours? A nacho buffet. Get it? Not yo buffet? Har har harrrr) I bought a big thing of nacho cheese (like you'd find in a #10 can at Sam's Club. I got mine at Walmart), a few bags of tortilla chips, and then in smaller bowls I had toppings like olives, jalapenos, taco meat, sour cream, and green onions. It was a huge hit! I put the cheese in the crock pot to keep it warm, and the chips in a huge yellow plastic bucket and let them at it. It was a huge hit! Even the kids loved it. :)
As for drinks, a fun drink is BRAZILIAN LIMEADE. Sooooo good!
Tuesday, May 11, 2010
Tissue Paper Flowers
Posted by Natalie at 8:47 AM
Subscribe to:
Post Comments (Atom)


2 people leaving some love!:
Your kids are so lucky! You're the most creative mama.
Hey Natalie! I know this is an older post of yours but I'm dying to know how you made the banner and table decoration in the picture above? I love it!!!! I'm planning my daughter's 2nd birthday party and would love to do something similar! I'm definitely going to make more tissue pom poms so thanks for the tutorial!
Post a Comment