


Okay, who's ready for another tutorial? If you look back to the post about Kate's Room Makeover, you 'll notice you can only see one corner of the room. You might be wondering what's going on in the entire other half of the bedroom. Well..this is one of the projects I just finished to help decorate the room. I thought I'd share it with you! The entire project costed $3. Yuppers, another Dollar Store project. I love these things! ANYWAY.....here we go!
YOU WILL NEED:
*Tissue Paper (8-10 sheets per flower)
*Pliable wire or craft pipe cleaners
*scissors Lay out your tissue paper in a stack. You can make it different sizes for different size flowers. The paper I'm showing is actually HALF sheets of tissue paper. It makes a medium size flower.
Now, fold your paper accordion/fan style about 1-1 1/2 inches wide
 Now, find the middle of your strip and wrap your wire or pipe cleaner around the center. Twist it a few times and cut off the extra.
 Now, round the edges by cutting with your scissors.
Fan it out...

And carefully pull up the layers.
 Once you have all the layers pulled out, (front and back) fluff it up and round it out to your liking!
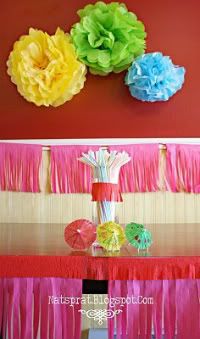
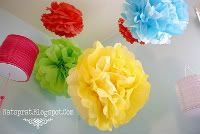
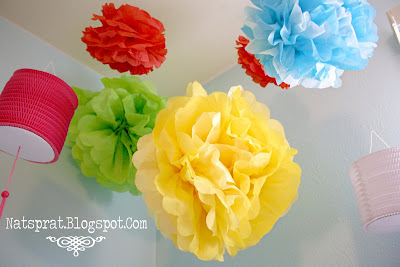 I made a bunch of them (in about half an hour) and tacked them to the ceiling with white thumbtacks and fishing line! I also hung up some paper lanterns (also found at Dollar Tree for $1 each). And that's it! I love how they turned out!
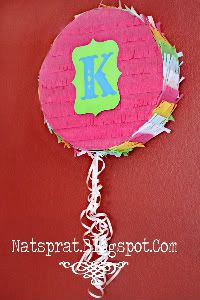
You can also use these for birthday party decorations. I used a version of them in Kate's 1 year birthday party...which I blogged about HERE. It's the same party with the mess free pinata.
Have Fun!!!
P.S. Want to know how to make some other tissue paper party decorations? Click HERE!
 Once you have all the layers pulled out, (front and back) fluff it up and round it out to your liking!I made a bunch of them (in about half an hour) and tacked them to the ceiling with white thumbtacks and fishing line! I also hung up some paper lanterns (also found at Dollar Tree for $1 each). And that's it! I love how they turned out!
You can also use these for birthday party decorations. I used a version of them in Kate's 1 year birthday party...which I blogged about HERE. It's the same party with the mess free pinata.
Have Fun!!!
P.S. Want to know how to make some other tissue paper party decorations? Click HERE!


21 people leaving some love!:
I love these! What a wonderful idea! Thanks for the tutorial :)
Wow. I thought they were a lot more complicated than that. Guess not!
And.. I'm wearing a sports bra in those pictures. So I could button my shirt. ha ha.
Such perfect timing! My niece's b-day party is this Sat. and I told my sister I'd make some of these! So glad I don't have to go searching for a tutorial now! Thanks!
These are so fun!! I'm going to have to try those! I think my daughter would love them in her room!
Very nice! I can't keep up with learning all your awesome projects! Keep 'em coming...you give us less creative people hope!
love love love these!! featuring them for handmade tuesdays. :) www.ladybug-blessings.com
i thought these took so much more time to do, so i'm going to have to give these a try. i've always loved them. so fun to look at.
happy weekend.
kellie
I love them, my daughter would adore them in her room. Thanks so much for sharing them.
Yay! I need to make some fun flowers for my laundry room. This is just the look I was hoping for. Thanks!
These are gorgeous! Tissue paper poms are just so darn versatile you can use them for any occasion.
awesome! I remember making these as a kid. :) So much fun. Great tutorial. You have a really cute blog... I am your newest follower! Take care.
Humble Homemaking
p.s. I have a weekend party going on right now so feel free to hook up if you would like to. :)
SO cute! I really want to put these in my daughter's room, but she is 18 months now and I am worried she is going to pull them down.
htothe3@gmail.com
turned out great! they are one of my favorite decorations for parties and showers!
I've been wanting these soooo bad. Now I can make them. Thank you so much for the tute! I'm going to hang them from my kids' playroom! P.S. I'm following along! Yay!
Miranda
www.justdrinkacoke.blogspot.com
If these cutie-patootie flowers weren't enough...I checked out the whole room makeover.
Beautiful! love the colours...
I'm your newest follower!
Cheers!
Theresa
Love these! I made some for my four-year-old's bday party to decorate and after her party I hung them in her room :)
These are so cute!! I'd love for you to link it up at I ♥ Nap Time.
I found this post through Making the World Cuter and wanted to say how much I like it! I would also love for you to link up with me on my blog, "Saturday Mornings" if you haven't been by yet! Everyone is welcome and prizes are awarded monthly to those who join in! Here is the link if you want to "Strut Your Stuff!"
http://www.thesaturdaymorningsblog.com/2011/03/strut-your-stuff-for-march-link-up_12.html
LOVE! Thanks for the tutorial! :)
Seeing this post brought back some wonderful memories for me ... we made a truck load of these for the work place some years ago ... great fun working with them.
These are so pretty! I thought they would be harder to make too. I may have to make some for my sons party next month...
Post a Comment